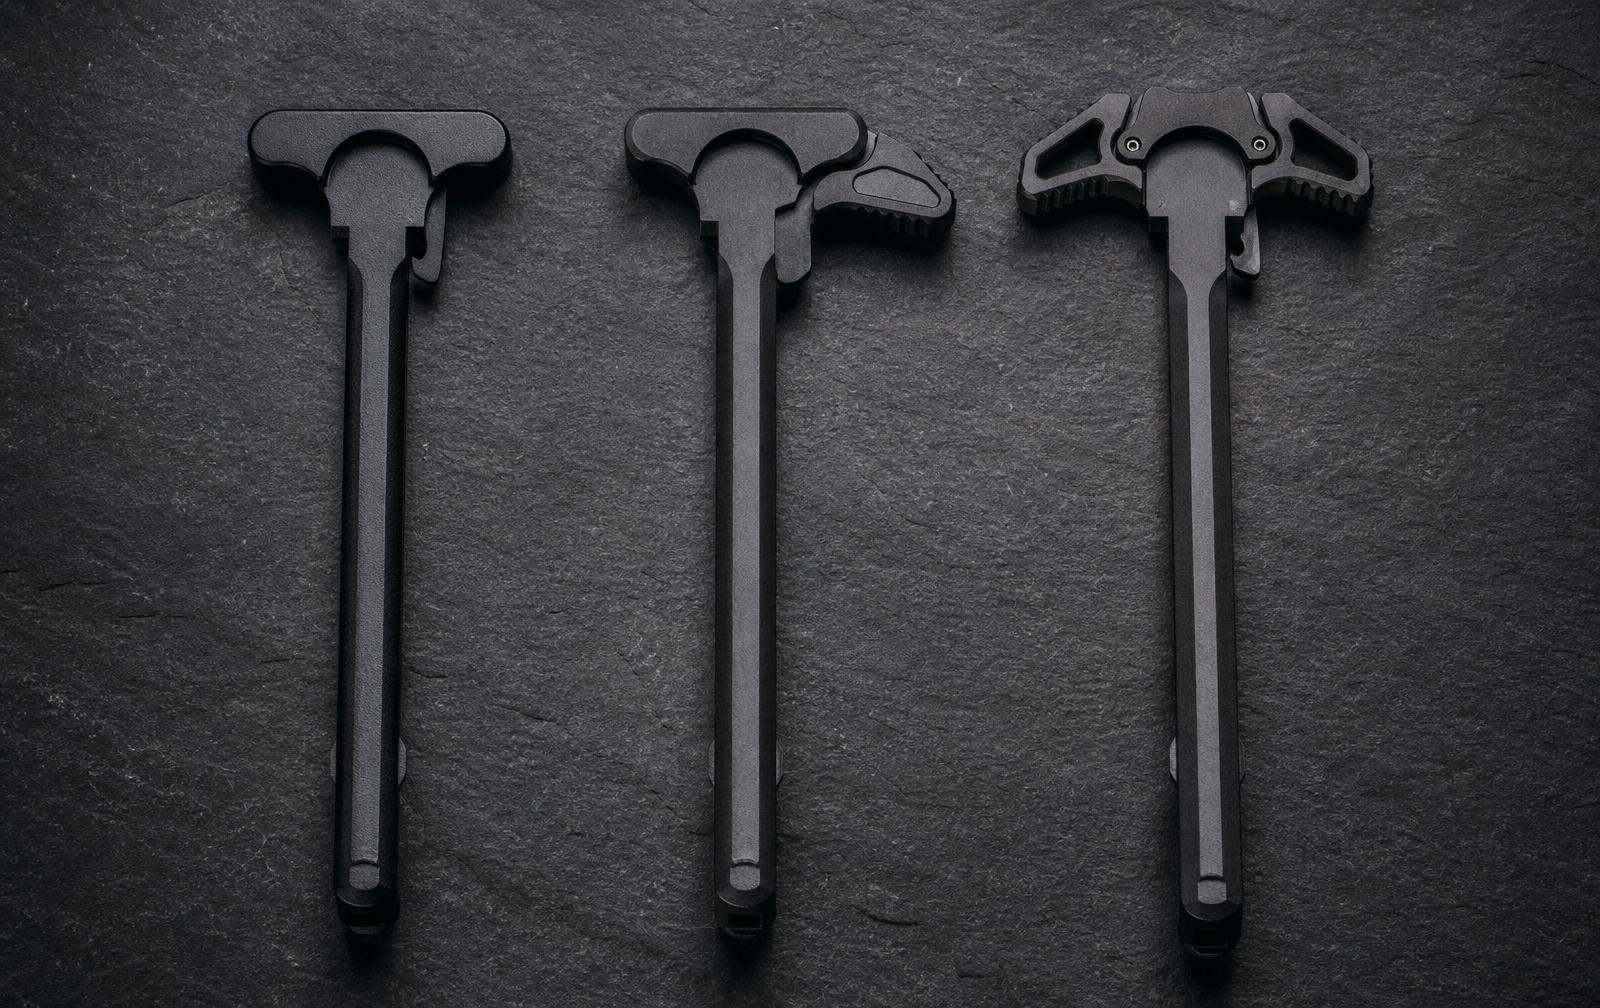
How AR-15 charging handles differ, standard mil-spec vs. extended tactical vs. ambidextrous, why shooters upgrade, and how to install one in five minutes.
The charging handle is the T-shaped lever at the rear of the upper receiver used to manually cycle the bolt carrier group, chambering the first round, clearing a malfunction, or locking the bolt back for inspection. It doesn't move when the rifle fires (the BCG cycles independently), but it's your only manual point of contact with the action, which makes its size, position, and latch design more important to daily handling than most shooters expect. It's also one of the least expensive, most commonly upgraded parts on the entire rifle, since a better handle can meaningfully change how the gun feels to operate without touching anything internal to the action.
Standard vs. Extended/Tactical Charging Handles
Standard mil-spec charging handles use a small, low-profile latch designed for a bare fingertip pull. This works fine on a clean, well-maintained rifle, but it becomes noticeably harder to grip under a few common conditions: gloved hands, a fouled or over-gassed action that requires extra force to rack, or any scenario where you need to charge the weapon quickly under stress.
Extended/tactical charging handles add a larger latch, often on both sides, that's easier to grip with gloves, wet hands, or under time pressure. The larger surface area also reduces the finger strain of repeatedly racking a stiff or high-round-count action during a long range session. The tradeoff is a small increase in weight and, on some designs, a slightly more prominent profile that can occasionally interact with certain optic mounts or rear iron sights if clearance isn't checked beforehand.
For most shooters, an extended latch is a low-cost, meaningful upgrade with essentially no downside, it's one of the most common first upgrades on a stock build for exactly this reason. Prices typically run $20 to $60 for a quality extended handle, which is inexpensive relative to the difference it makes in day-to-day handling. The main scenario where a standard handle still makes sense is a build intentionally kept close to mil-spec configuration, such as a retro clone or a rifle built to duplicate an original service configuration.
Ambidextrous Charging Handles
A standard AR-15 charging handle's latch sits on the left side of the receiver, designed around a right-handed shooter's support hand reaching over the top of the gun. For a right-handed shooter, this is a non-issue. For a left-handed shooter, it means breaking cheek weld and reaching across the body (or under the optic) every time the action needs to be charged manually, awkward at best, and slow enough to matter in a defensive or competitive context.
Ambidextrous charging handles solve this by adding a second latch on the right side of the handle, letting a left-handed shooter charge the weapon with their trigger hand without breaking their firing grip or cheek weld. This is one of the most requested upgrades among left-handed AR-15 owners specifically, and for good reason. Unlike some other "handedness" issues on the platform (magazine release, bolt catch), the standard charging handle's left-side-only latch has no ergonomic upside for a lefty at all.
For a left-handed shooter, an ambidextrous charging handle is a functional fix, not a preference.
Even for right-handed shooters, an ambidextrous handle isn't wasted money. It adds a second charging option for off-hand manipulation, shooting around cover from the opposite shoulder, or simply having a backup latch if the primary side is ever inaccessible. But if you're a left-handed shooter building or upgrading a rifle, an ambidextrous charging handle should be treated as close to a default requirement rather than an optional nice-to-have, it's addressing a real functional gap, not just a preference, in the same category as an ambidextrous safety selector or magazine release for a left-handed build.
Common Upgrades and Why People Replace the Stock Charging Handle
Beyond the extended-latch and ambidextrous upgrades already covered, a few other factors drive charging handle replacement:
- Gas key and buffer tube clearance issues. Some non-standard stocks, especially folding-stock adapters, can create clearance conflicts with a stock charging handle's latch travel. A different handle profile sometimes resolves this without needing to change the stock itself.
- Optic and rear sight interference. Extended latches on some designs sit slightly higher or more rearward than mil-spec, which can occasionally contact a large rear optic or backup iron sight when charging. Checking clearance with your specific optic setup before buying an extended handle avoids a frustrating return.
- Durability on high-round-count rifles. Mil-spec charging handles are generally reliable, but some aftermarket designs use thicker gas key contact surfaces or improved roll pin retention to reduce wear on rifles that see very heavy use.
- Aesthetic and build matching. A meaningful share of charging handle upgrades are simply about matching finish and styling to the rest of a build, this is a valid reason to upgrade even without a functional complaint about the stock part.
- Latch shape preference. Some shooters find winged or paddle-style latches faster to grip under stress than a traditional flat latch, independent of whether the handle is extended or ambidextrous. This is largely a feel-based preference worth testing in person or reading hands-on reviews about before committing.
Note that a charging handle upgrade doesn't require replacing the bolt carrier group, the two are separate, independently compatible components, so swapping one has no effect on the other's function or reliability.
Installation Basics
Replacing a charging handle is one of the simpler upgrades on the platform: retract the old handle partway, pull the bolt carrier group out from behind it, slide the old handle out of its channel, and reverse the process with the new handle and BCG. No torque specs or specialty tools are required, this is a five-minute job with the upper separated from the lower or left assembled, depending on your preference. The only real point to double-check is that the new handle's latch clears your specific optic, rail accessories, and stock, a quick visual check before final assembly avoids having to redo the swap.
For the full walkthrough of separating the upper and lower, reinstalling the BCG and charging handle together, and performing a function check afterward, see our complete AR-15 upper installation guide.
Ready to upgrade? Browse the full charging handle selection at ar15parts.com for extended-latch, ambidextrous, and mil-spec options.